Saturday, September 4, 2010

New patterns added to Montana Fly Company Line Up for 2011


I will have two new patterns added to Montana Fly company line up for 2011. The first pattern is the "D" rib black stone fly nymph. It is basically the same pattern as the golden but tied in black . The thorax is tied with peacock herl, I love the iridescent of the peacock herl in this pattern.


 The second pattern is the bead head version  of the "D" rib golden stone nymph. The bead I'm using is the Montana Fly Luccent tungsten bead in the coffee color. The fly is also tied on the 3xl bent shank hook by Montana Fly company. With the lead under body and the tungsten bead this one gets down deep fast.


Montana fly is also adding another size for the "D" rib golden stone nymph, they are adding a size 14 in that pattern. That is the size I fish the most.

Sunday, August 15, 2010

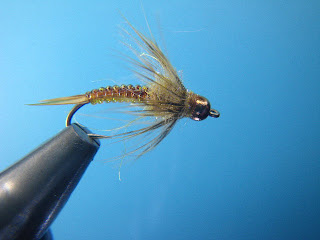
Soft Hackle "D" rib Golden Stone Nymph

This is a creation I have been playing with for a while. The rear half of the nymph is from my "D" rib Golden Stone nymph. The front half came from another nymph I saw. The combination of patterns has been deadly on the water. The soft hackle collar is a combination of CDC and Whiting Farms Brahma Hen neck in a Golden Olive.  When this fly is in the water it has a lot of movement. With the tungsten bead and the under body of lead tape will allow this nymph to get down deep fast. On my last trip I was trialling this of  a DH Hopper with great success.

Rear view

Group photo

Brahma Hen Neck

Brahma Hen Neck Golden Olive

Sunday, August 8, 2010

Razor Foam Caddis tying tutorial

Razor foam Caddis, simple but effective fly.
Three basic materials for this fly. Standard dry fly hook, deer or elk hair for the wing. Standard brown dry fly hackle, and of course razor foam. For this pattern I like the razor faom from Wapsi. It is a little more elastic and that helps with getting a nicely tapered body.

Step 1: Lay down a base of thread on the hook shank

Step 2: Cut a narrow strip of razor foam, taper at the tie point. The thickness of razor foam I use is based on the hook size, size 14 and smaller I use .5mm thickness. Size 12 and up I use the 1mm thickness

Step 3: Tie in the razor foam, I lke to tie in at mid point of the the hook shank and bind it down towards the bend of the hook
Step 4: Wrap the razor foam foward, adjust tension on the razor foam to create a nicely tapered body. Wind forward to just past mid point of hook shank
Step 5: Clean and stack a clump of deer or elk hair for the wing. Tie it in and bind the ends. Cover the ends with thread. With right type of elk or deer hair you can tie this fly down to a size 20 with out any problems.
Step 6: Select and tie in the apporiate sized dry fly hackle. I tie them shining side up.

Step 7: Wrap the hackle forward and tie of at the head. Do not crowd the head like I just did


Completed fly

I tie these also in black, olive and yellow

Saturday, August 7, 2010

Anglers All Fly Shop Winter tying demo schedule updated 9/5/10

Just wanted to let everybody here in the Denver metro area that I'm working with the new owners of Anglers All (Gary & Chris) helping them set up a winter tying demo schedule. The demos will be Saturday mornings starting at 10:00 going till 12:00. All demos will be shown on a HD TV up behind the tier. The shop has a first class set up, they also have one of the better stocked tying sections in the metro. Check there web site out under events, they will be updating the list as I add tiers.

http://www.anglersall.com/

Here is the list of tiers I have scheduled so far


10/30/10

11/6/10 - Carl Pennington

11/13/10 - Chad Gaurke

11/20/10 - Juan Ramirez

11/27/10 - Jason Goodale


12/4/10 - Vincent Stu

12/11/10 - Shea Gunkel

12/18/10 - Marty Bartholomew


1/8/2011 - 2011 Fly Fishing Show

1/15/2011 - Ty Clifton

1/22/2011 - Larry Jurgens

1/29/2011


2/5/2011

2/12/2011 West Denver TU Fly tying clinic

2/19/2011

2/26/2011


3/5/2011 - Rick Takahashi

3/12/2011 -

3/19/2011

3/26/2011 - Al Ritt

Sunday, August 1, 2010

DH Hopper protype

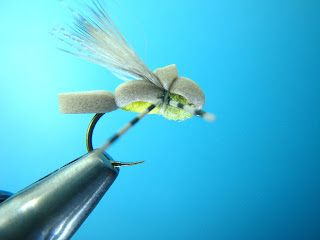
 I have customer that really likes the Streambank hopper, he also really likes my DH Hopper. The one thing that caught his eye with Streambank Hopper was the strip of orange. He challenged me to incorporate the orange foam into my DH hopper. The first challenge is trying to figure out the best glue to use. Super glue and Zap A Gap dose not work for gluing foam together. When the super glue dries it will not allow the thread to compress the foam. In tying the DH Hopper you need the thread to compress the foam down alot.  I went on the search for the correct adhesive for gluing foam together. What I found was that regular contact cement works great. It leaves the foam in a pliable state. Now it comes down to playing with the thickness of the foam, the one tied above is tied with 2mm brown and .5mm orange. Finding the thinner foam for this is a little tricky. Raineys cross link foam comes in thicknesses of .5mm. 1mm, & 2mm. I also found Wrigthway foam has the same thickness. I hope to have a fishing report sometime later in the week for the above hopper.

 Streambank Hooper
 Streambank Hooper

 DH Hopper
DH Hooper

Friday, July 30, 2010

DH Hopper Tying tutorial

DH Hopper

I have been tying this hopper for a while. I have had a few requests for a step by tutorial for this fly. The DH Hopper has been one my hottest sellers for this summer. The pattern is a easy tie and has simple materials.
Hook: 2xl dry fly hook MFC#7022 size 10 thru size 14
Thread: 6/0 tan
Overbody: 2mm foam Brown
Underbody: 1mm Razor foam Tan
Underwing: Rainbow Crystal Flash
Overwing: Natural Bull Elk
Thorax: Tan UV Ice Dubbing
Legs: Brown centipede legs


Step 1: Attach thread and cover shank of hook

Step 2: Cut a piece of 2mm foam. The width of foam should be the width of the hook gap.

Step 3: Attach 2mm faom to the hook shank, right above the barb of the hook. Advance the thread to the 3/4 point on the hook.

Step 4: Cut 1mm foam in a strip about 1/8" wide. Tapper the tie point.

Step 5: Attach 1mm razor foam at about 1/2 point on the hook shank. Bind down foam to tie point for the 2mm foam.

Step 6: Wrap the 1mm faom foward, first wrap needs to be handled with care. As you wrap the foam forward it will create a nice segmented body. Wrap forward to the 3/4 point of the hook shank and tie off.

Step 7: Pull 2mm foam over the body and bind down. Bind down all the way up to the eye of the hook. Do not trim the foam out over the eye.

Step 8: Attach about 6 strands of rainbow crystal flash

Step 9: Attach elk hair wing, length of wing should just go back past the tie in point for the overbody.

Step 10: Dub the thorax with UV Ice dub. Note where the thread ends up.

Step 11: Attach rubber legs on each side of the body

Step 12: Pull faom back over the thorax and bind down. Whip finish and trim foam back. Trim legs to length

View of finished fly from bottom

View of finished fly from bottom with tan and yellow


Give this pattern a try. Let me know what you think.


Friday, July 2, 2010

Mini DH Hopper Challenge


I have been tying my DH hopper in standard sizes for a while, it has been a very productive pattern. I tie it in a wide range of colors. I have a customer that has been ordering my DH hopper in size 12, he seems to really like it. He had a strange request this week, he wanted the DH hopper in a size 16. I thought about it and said I can do this. The biggest challenge with this fly would be what hook to use. A standard dry fly hook would have no gap left after you tie the fly. After a couple of tries I settled on a TMC2499SPBL hook is a size 12. The shanks length of that hook closely matched that of a size 16 2XL dry fly hook.   I also liked that it had a slight curve to the hook.

Group photo
I think this little hopper could hold a a good size dropper


Bottom view

I wish Montana Fly Co. made those red/black/yellow rubber legs in a small size


I think this little fly has a lot of potential as a attractor dry fly in these sizes. I'm also going to try it on the same hook but is a size 10.  I don't think I would take it any smaller than this.

Saturday, June 12, 2010

New mayfly nymph pattern - BWO colors

Been playing around with this little pattern. Wanting a fly with a little more kick to it. 

Hook: MFC #7076 1XL
Bead: Brass
Thread: 14/0 Olive
Tail: Partridge
Abdomen: Peacock Krystal Flash over olive thread
Legs: Partridge
Wing: Pearl Krystal Flash
Thorax: Olive Dubbing 

Basically the same fly with a few minor changes
1. Olive tungsten bead
2. Legs are olive flouro fibre 
3. Tail is a olive dyed partridge